How to Stream your PhD Defense on YouTube
By Benjamin Ackerman
March 14, 2020
As the COVID-19 pandemic unfolds, many of us have started to see most of our academic gatherings move to online. No doubt, this shift has caused a lot of stress and anxiety, especially for PhD students with upcoming thesis defenses scheduled. There’s been a lot of uncertainty around whether universities and departments will allow defenses to proceed as scheduled, whether they would require that they be held remotely, or (worst case) they would ask that defenses be rescheduled altogether.
I feel very lucky that I was able to complete my dissertation defense in person last Monday, two days before JHU moved all classes online and cancelled large gatherings. Still, I had prepared for a remote defense option by setting up a Zoom call for my committee, and a YouTube Live stream in case friends and family were unable to attend my public seminar. I decided to stream my defense anyway, and thought I would write up a short blog post on how I set up my YouTube Live stream, in case this information would be helpful to any students out there!
You may be asking: Why not do the whole thing on Zoom?
Zoom is a really great option for streaming defenses! You can share your screen easily, connect your computer video camera, and even record the whole thing! I liked using YouTube because I could share the link with folks who are less familiar with Zoom (particularly family and friends outside of academic), and the YouTube option doesn’t require people to download any new software. Since people don’t call in to YouTube, this also prevented accidental noises from viewers/callers with microphones on… Lastly, I was able to save the recorded footage to my own personal YouTube account, which I can now share easily and directly with anyone who wishes to watch! Also, to see what the end product of this blog post looks like (and if you’d like to watch my defense seminar 😉) click here!
Note: I have not tried using Zoom and YouTube Live at the same time. If you need to communicate with your committee members through software like Zoom, please be sure to test out and make sure that the setup below will be compatible with the requirements of your school/department/committee! One thought off the top of my head might be to set up the Zoom call, and then just stream the window of the Zoom call on YouTube… but please let me know if you find a better way if you try this!
Update: Apparently you can also stream a Zoom call directly to YouTube! Learn more here.
Step 0: Make a YouTube account
Fun fact: if you have a Google account, you already have a YouTube account! For this post, I’m going to assume that you already have a YouTube account created.
Step 1: Set up the stream on YouTube Live
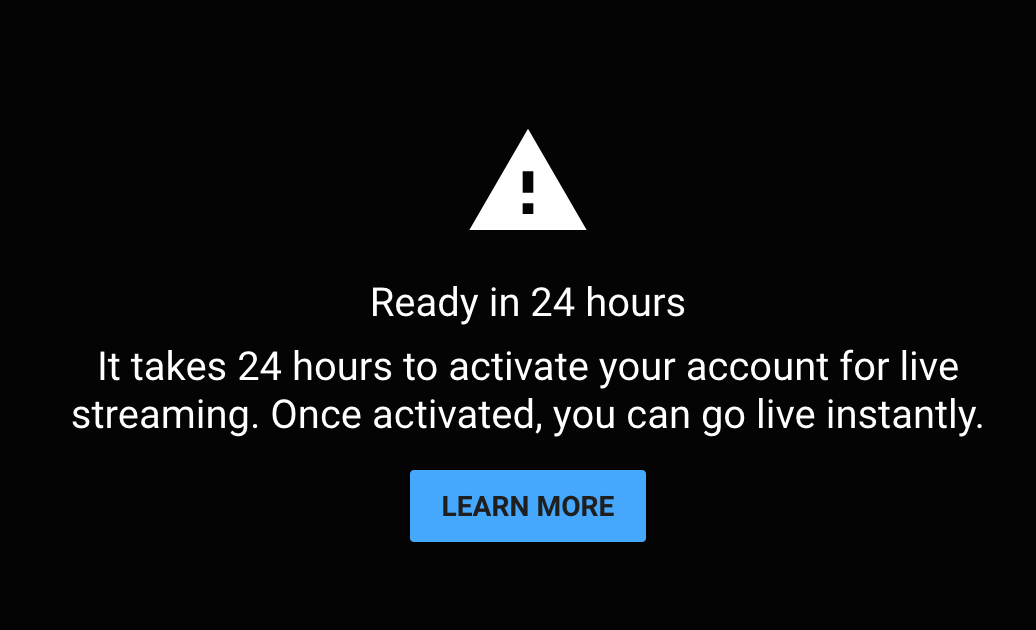
🚨IMPORTANT:🚨 In order to use the stream feature on YouTube, you will have to verify your account. In the top right hand corner of your account, click on the little camera icon, which will prompt you to “Create Video or Post.” Select “Go Live,” and follow the steps to verify your account. It will take up to 24 hours to gain access to this feature, so if you’re considering using YouTube to stream your defense, start setting this up ASAP!
Once you have your YouTube account (and have verified it) here’s how to set up and scheduled the stream:
- In the top right hand corner of the YouTube homepage, click on the little camera icon, which will prompt you to “Create Video or Post”
- Click “Go Live”
- On the top of the screen, select “Stream”
- Fill in the details about your defense!
- Once set up, locate the Stream Key. You will need to copy and paste this momentarily!
🌟 Tips and Tricks:
- 🗓 Set the scheduled date to remind people of the time and date of your defense (but don’t worry, you can start the stream whenever! Good to get it started and double check everything works before the defense starts)
- 🎥 If you don’t want your defense public on YouTube, set privacy to Unlisted. That way, only people with the video link can access it (and watch it back later!)
- 📝 If you want folks to be able to comment live, select “No, it’s not made for kids”
- 📸 Add a preview photo! Maybe pick the title slide of your seminar slide deck, or a screenshot from an advertisement flyer, or a headshot!
Step 2: Download and Configure Streaming Software
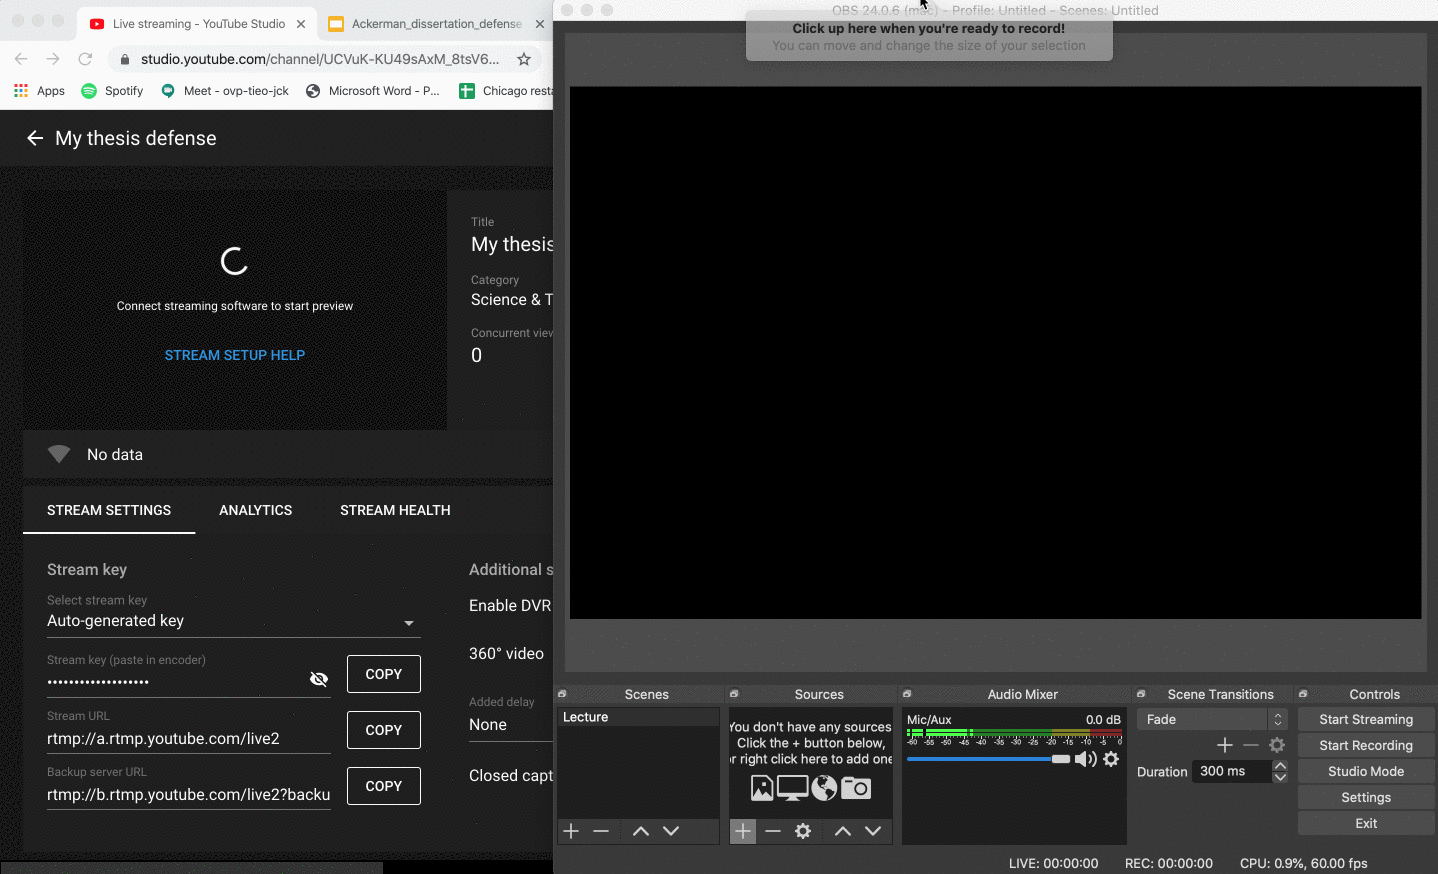
YouTube Live allows you to set up streams in two ways: 1) stream directly from your computer camera, or 2) connect to streaming software to mirror screens, windows, and configure more complicated layouts. For my defense, I wanted to stream both my computer camera footage and my slides, so I decided to set up the latter. In order to do so, I had to download software to format the streamed screen layout.
I like OBS, which is free and fairly easy to use! Here’s my advice on how to get a simple layout set up, but I encourage you to play around with the other OBS features:
- In the preferences, configure the service settings:
- Choose “YouTube/YouTube Gaming” as service
- Find the Stream Key on your YouTube Live stream settings. Copy from YouTube and paste into OBS
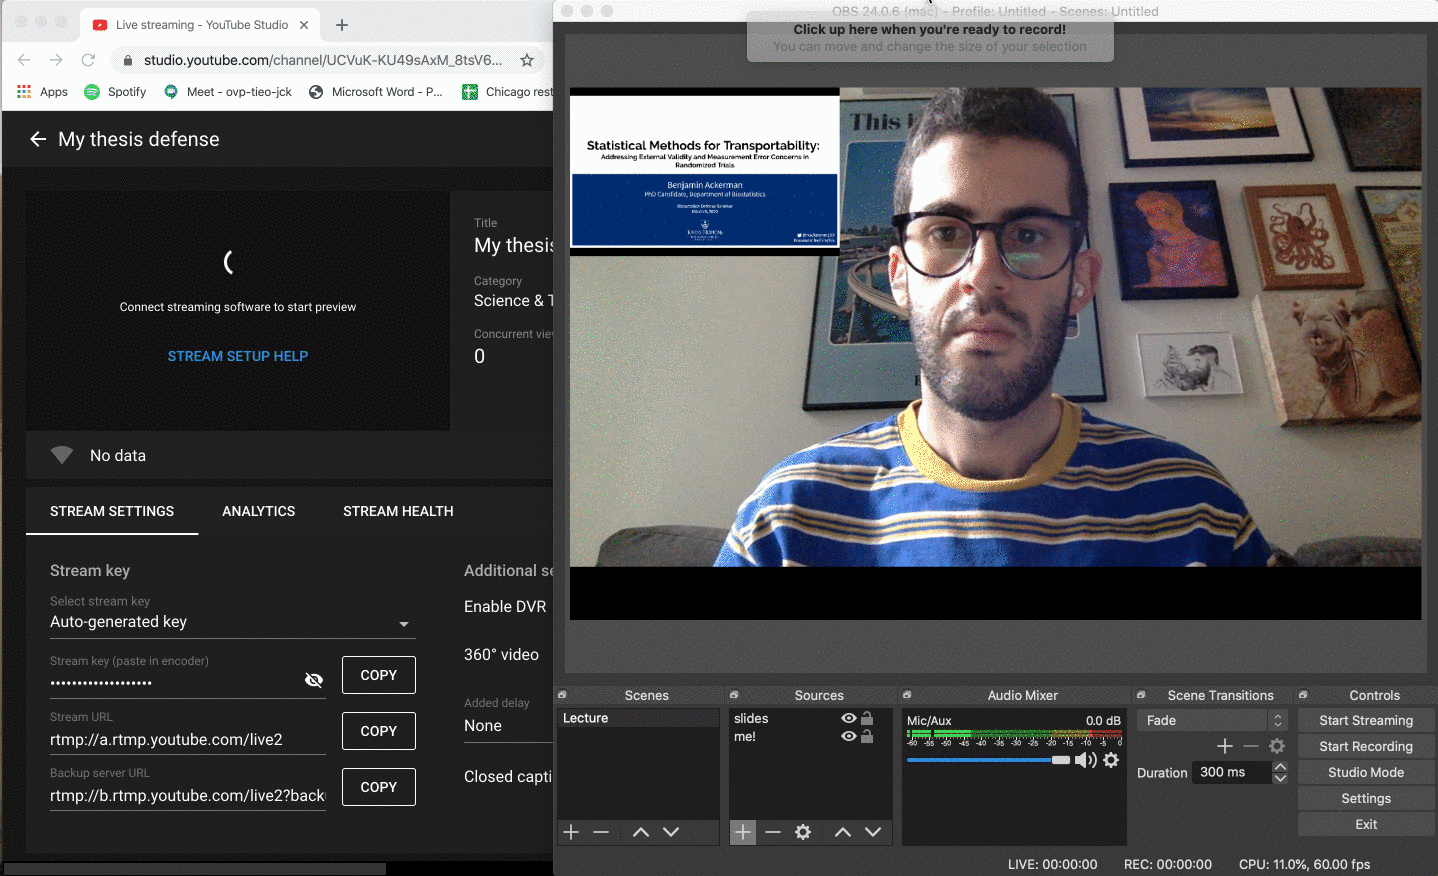
- Configure the stream screen capture. To do this, add different “sources,” then click and drag them to arrange (see GIF below for example). The two sources I use are:
- Video Capture: to show your face!
- Window Capture: to show your slides!
🌟 Tips and Tricks:
- 🧐 Sometimes when using Window Capture, the window won’t show up if it’s already in full screen (or, it will only show up properly in full screen). Play around with the Window Capture with your slides a bit first, whether you’re using Google slides, Powerpoint, or Latex Beamer slides.
- 🤗 Try different layouts! I liked having my slides big, with a small window of my video in the corner. Maybe you prefer the opposite! Or having them more side by side! Lots of options.
Step 3: Start Streaming!
Now that you’ve set up the OBS streaming layout, it’s time to connect it to YouTube and go live!
- On OBS, hit “Start Streaming” to send the stream to the YouTube Live stream link
- On YouTube, check to make sure the stream is showing up
- When ready, click “Go Live” on YouTube. You’re all set to present!
🌟 Tips and Tricks:
- 🔜There will be a delay between what’s shown on the OBS window and what’s streamed on YouTube. Don’t panic if it takes a few moments for the stream to appear when you first connect!
- 🤯 I personally found the OBS window and the YouTube Live window to be a bit distracting, so I kept them open in the background, but brought my slides to the forefront so I could focus on them while giving my talk.
Step 4: Finish Streaming
Once you’re all done, don’t forget to hit “End Stream” on YouTube, and then exit from OBS. Your saved video will be available on YouTube shortly after, and the same link you used to stream it will allow you to edit and share the recorded seminar, too!
There you have it! Again, it may be very disappointing to move your defense seminar to a remote option. You’ve worked so hard, and you want to celebrate that with the people nearest and dearest to you! Hopefully this tutorial can help provide you with an option that, though not ideal, will allow you to share the culmination of your dissertation work with the world. If you have any questions, comments, or ideas, please reach out and let me know!